Planting
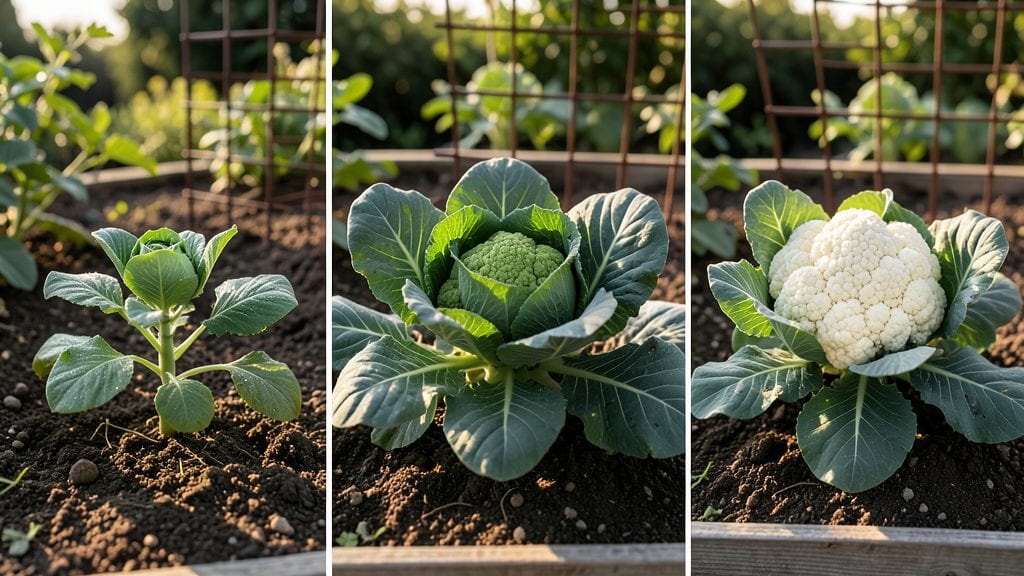
Understanding the cauliflower plant stages transforms a confusing 90-day journey into a predictable, rewarding process. I spent years watching seedlings bolt or heads split open before realizing timing and conditions were the missing pieces—not luck.
The secret isn’t complicated: each stage has specific needs, from the moment those first leaves unfurl to when you harvest that perfect white dome.
Your first milestone comes at 2-3 weeks when seedlings develop their first true leaves—those are your cues to harden them off. Then comes the critical head formation phase around 45-55 days, when you’ll see that familiar curd beginning to swell.
Too much heat or drought here, and you’ll lose everything. The payoff? A 60-90 day harvest window where properly cared-for plants yield heads weighing 2-4 pounds each.
What sets successful cauliflower growers apart is paying attention to the leaf canopy—it should stay dense but not crowded, and the head needs consistent moisture to stay firm. Split heads? Usually a sign of uneven watering or temperature swings.
Master these stages, and you’ll go from wondering "why isn’t this working?" to celebrating harvests that rival the grocery store—except these taste like nothing else.
This isn’t just about timing—it’s about creating the right conditions at each turning point. Whether you’re growing in cool mountain air or a hotter coastal climate, the principles stay the same. Let’s break down exactly what to watch for at each phase so you can troubleshoot before problems start.
📚 In This Guide
- What you need
- Instructions
- Tips and common mistakes
- Wrapping up and next steps
What you need
- ● Cauliflower seeds: Choose disease-resistant varieties like Snowball or Purple of Sicily (10-20 seeds per plant, depending on space).
- ● Seed starting mix: 5-10 lbs of sterile, well-draining potting soil (e.g., Miracle-Gro Seed Starting Potting Mix).
- ● Growing containers: For seedlings: 2-3 inch biodegradable pots or cell trays (50+ cells).
- ● For transplanting: 12-inch diameter pots or garden beds with 18-24 inches of spacing between plants.
- ● Grow lights or sunny window: Full-spectrum LED lights (12-16 hours/day) or a south-facing window with 6+ hours of sunlight.
- ● Watering can or spray bottle: Fine mist setting for seedlings; gentle watering for mature plants.
- ● Fertilizer: Balanced liquid fertilizer (e.g., 10-10-10) for seedlings.
- ● High-nitrogen fertilizer (e.g., 5-10-10) for vegetative growth; switch to phosphorus-heavy (e.g., 0-10-10) when flowering.
- ● Mulch: 2-3 inches of straw or shredded leaves to retain moisture and suppress weeds.
- ○ Garden stakes or cages: 2-3 ft tall to support heavy heads (optional but helpful).
- ● Soil thermometer: To monitor germination temps (ideal: 60-70°F).
- ● Row covers: For frost protection (lightweight fabric, 3-4 ft wide).
- ● pH test kit: Aim for soil pH 6.0-7.0 (cauliflower loves slightly acidic soil!).
- ● Compost or worm castings: Boost soil fertility with 1-2 cups per planting hole.
- ● Pruning shears: For trimming lower leaves to improve air circulation.
How to recognize and guide cauliflower through its growth phases
Understanding each phase transforms guesswork into confident cultivation.
🌱 Step 1: Germination and Seedling Emergence (Days 0-14)
Start by sowing seeds ½ inch deep in 60-70°F soil. Keep the surface consistently moist but never soggy—you’ll know it’s right when the top inch feels like a damp sponge. Germination typically occurs in 7-14 days, though cooler soils may delay sprouts by another week. The first true leaves (not the initial cotyledons) signal readiness for transplanting.
Here’s the thing—cauliflower seedlings are delicate. If they emerge pale and leggy, your light source is too weak or too far away. Move them within 2-3 inches of a grow light or to a south-facing window immediately. Leggy seedlings rarely recover proper strength, so act fast. Once seedlings have 2-3 true leaves, they’re ready for transplanting into larger containers or garden beds.
🌿 Step 2: Vegetative Growth and Head Formation (Weeks 3-6)
During this phase, your cauliflower will focus on leaf production before curd development. Provide full sun (6-8 hours daily) and maintain soil moisture at 65-75°F. You’ll notice the plant’s lower leaves yellowing and dying back—this is normal as energy shifts upward. The key visual cue is the central growing point (the "heart") where the head will form.
This is when variety matters. Purple cauliflower varieties, like ‘Graffiti,’ will show their true colors, while green types like ‘Snowball’ stay uniform. If the central leaves start to spread outward instead of curling inward, your plant is stressed—likely from temperature swings or nutrient deficiency. Apply a balanced fertilizer (10-10-10) if the leaves look pale or stunted. Avoid over-fertilizing, though; too much nitrogen promotes leafy growth at the expense of head formation.
☀️ Step 3: Head Development and Pre-Harvest Care (Weeks 7-10)
The head begins to form when the central leaves tighten into a compact, dome-like shape. This is the most critical phase for temperature control. Ideal conditions are 60-75°F during the day and 50-60°F at night. If temperatures rise above 80°F, the head may bolt (send up a flower stalk) or become loose and misshapen. Shade cloth can be a lifesaver in hot climates.
Watch for butterfly-shaped leaves emerging from the head—this is a sign the plant is preparing to bolt. If you see this too early, your cauliflower may have experienced heat stress or daylength changes. Keep the soil consistently moist but not waterlogged, as uneven moisture can also trigger bolting. A mulch layer (2-3 inches) helps maintain steady soil temperatures and retain moisture.
✂️ Step 4: Harvesting at Peak Maturity (Weeks 11-12)
Harvest when the head is firm, compact, and reaches 6-8 inches in diameter. The outer leaves should still be tightly wrapped, and the curd should feel solid to the touch. If left too long, the head will loosen and develop a yellowish tint—this is your plant telling you it’s past its prime. Use a sharp knife to cut the head 1-2 inches below the base, leaving the outer leaves intact to protect the plant’s energy for potential side shoots.
Real talk: Not all cauliflower plants produce a single head. Many varieties, like ‘Monu,’ will send out side shoots after harvest. These smaller heads are edible but may require blanching (tying the outer leaves together) to stay tender. If your main head bolts, don’t toss the plant—harvest the flower stalks for their mild, nutty flavor before they mature into seeds.
Tips & tricks for perfect cauliflower growth phases
Mastering each stage of cauliflower development turns uncertain gardening into predictable success.
Seedling Lighting Strategy: In Step 1, when you notice seedlings stretching toward light, it’s a clear sign they need more intensity. Position your grow lights just 2-3 inches above the seedlings to prevent legginess—this mimics natural sunlight and strengthens stems. I’ve found that seedlings under artificial light need 12-14 hours of light daily during this phase to grow sturdy, not just tall. If you’re using natural light, rotate your seedlings every few days to ensure even growth toward all directions.
Temperature Fine-Tuning: The 60-75°F range mentioned for different stages isn’t just a suggestion—it’s critical for preventing stress. In Step 2, when your plants are focusing on leaf production, maintain soil temperatures between 65-70°F during the day. A soil thermometer is your best friend here; cooler soils slow growth, while warmer soils can cause bolting. If your garden experiences temperature swings, use row covers at night to maintain those 50-60°F nighttime temperatures during head development (Step 3).
Visual Cues for Head Formation: During Step 3, when the central leaves begin tightening, watch for the "butterfly leaves" as your early warning system. These small, distinctive leaves indicate the plant is preparing to bolt. If you see them too early, immediately check your growing conditions—especially temperature consistency and moisture levels. I’ve learned this the hard way: one summer, my cauliflower bolted prematurely because I underestimated how quickly afternoon temperatures could climb past 80°F. A simple shade cloth saved my next batch.
Harvesting Precision: The 6-8 inch diameter guideline in Step 4 is your target, but don’t rely solely on measurements. Press gently on the head—it should feel firm like a dense cabbage, not spongy. The outer leaves should still be tightly wrapped, almost like a closed umbrella. If you harvest too early, the head won’t reach full flavor potential; too late, and you’ll get that dreaded yellowing. I’ve found that harvesting in the morning gives the best texture and flavor, as the plant’s moisture content is highest then.
Pro Tips for Cauliflower Plant Stages
- Mastering each stage of cauliflower development turns uncertain gardening into predictable success.
- Seedling Lighting Strategy: In Step 1, when you notice seedlings stretching toward light, it’s a clear sign they need...
- Temperature Fine-Tuning: The 60-75°F range mentioned for different stages isn’t just a suggestion—it’s critical for p...
Frequently asked questions
Got questions about growing cauliflower? You’re not alone! Here are answers to the most common queries about cauliflower plant stages—from seed to harvest—so you can grow a thriving crop with confidence.
How long does it take for cauliflower to go from seed to harvest?
Most cauliflower varieties take 90–120 days to mature from seed to harvest, depending on the type. Early varieties (like ‘Snowball Y Improved’) may be ready in 60–80 days, while late varieties can take up to 150 days. Always check the seed packet for exact timing!
Can I grow cauliflower year-round, or is it seasonal?
Cauliflower thrives in cool weather (50–75°F) and struggles in extreme heat or frost. In warm climates, plant in fall or winter; in cooler regions, aim for early spring or late summer. Some gardeners use shade cloth to protect plants from summer heat.
What should I do if my cauliflower plants bolt (send up flower stalks) too early?
Bolting happens when plants sense heat or stress. To prevent it:
- Use shade cloth in hot climates.
- Water consistently to avoid stress.
- Choose heat-tolerant varieties like ‘Cheddar’ or ‘Violetta.’
- Harvest smaller side curds if the main head bolts.
Can I eat cauliflower leaves or stems if the head doesn’t form?
While the curd (head) is the star, leaves and stems are nutritious and delicious. Young leaves can be used like greens (sautéed or in salads), and stems are great chopped into stir-fries. It’s a great way to reduce waste!
What pests or diseases commonly attack cauliflower, and how do I stop them?
Watch for:
- Cabbage worms: Handpick or use Bt (Bacillus thuringiensis) spray.
- Aphids: Blast off with water or use neem oil.
- Clubroot: Avoid planting in infected soil; use resistant varieties.
- Black rot: Remove infected plants and rotate crops.
Wrapping up and next steps
Understanding the cauliflower plant stages is your secret weapon for a bountiful harvest! From tiny seedlings to a lush, ready-to-pick head, each phase plays a crucial role in growing healthy, delicious cauliflower.
With the right care—like consistent watering, proper spacing, and timely harvesting—you’re well on your way to enjoying homegrown veggies in just 90 days! 🌱
Now that you’re armed with knowledge, take the next step—grab those seeds, prep your garden, and get planting! Whether you’re a seasoned gardener or a curious beginner, every little effort brings you closer to a crisp, flavorful reward. Happy growing! 🌟