Flowers
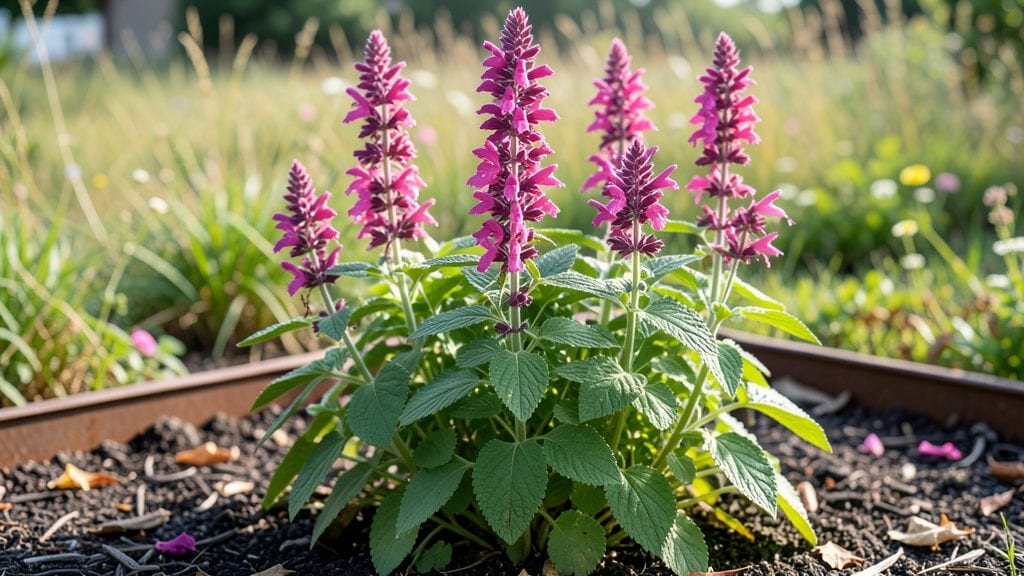
Growing monarda bee balm flower might seem intimidating at first, but I’ve learned the hard way that this plant rewards patience with vibrant, hummingbird-loving blooms that last from summer through fall—and sometimes even winter in mild climates.
The key is mimicking its native woodland edge habitat: rich soil, morning sun, and afternoon shade. My first attempt nearly failed when I planted it in full sun, but once I adjusted, the difference was shocking—taller stems, bigger flowers, and bees buzzing nonstop.
Bee balm thrives in well-draining soil with plenty of organic matter, and it’s surprisingly low-maintenance once established. You’ll need a spot that gets at least 4-6 hours of sunlight, though it tolerates partial shade beautifully.
Water consistently during the first year to help roots spread, but once settled, it’s drought-tolerant enough to handle dry spells. The real magic happens when you prune back one-third of the plant after the first flush of blooms—this triggers a second wave of flowers and keeps the plant compact.
What you’ll love most is the year-round starburst beauty this plant offers. The tubular flowers attract hummingbirds, bees, and butterflies like nothing else, while the aromatic foliage (crush a leaf and you’ll smell mint!) adds a sensory delight.
Even the dried seed heads add winter interest, and the roots spread slowly, making it a great perennial for borders or pollinator gardens. Once you see your first hummingbird hover over the blooms, you’ll understand why gardeners can’t get enough of bee balm.
Whether you’re a beginner or a seasoned gardener, bee balm is a foolproof addition that brings color, life, and movement to any space. It’s perfect for cottage gardens, pollinator patches, or even container gardens—just give it room to grow.
Let’s get those roots in the ground and turn your yard into a buzzing, blooming paradise.
📚 In This Guide
- What you need
- Instructions
- Tips and common mistakes
- Wrapping up and next steps
What you need
- ● Monarda bee balm seeds or nursery plants: Seeds: 1 packet (typically 50-100 seeds, depending on the brand). Plants: 3-5 healthy nursery starts (for faster blooms).
- ● Well-draining potting mix or garden soil: 1-2 bags (10-15 lbs each) enriched with compost.
- ● Containers or garden bed: Containers: 5-6 inch pots (1-2 per plant) with drainage holes. Garden bed: Full sun to partial shade spot (6+ hours of sunlight daily).
- ● Watering can or hose with a gentle spray nozzle.
- ○ Organic fertilizer (optional but recommended): Balanced 10-10-10 or slow-release granules.
- ○ Gloves (optional): To protect hands from prickly stems.
- ● Hand trowel or small shovel: For transplanting or digging.
- ○ Mulch (optional): Straw or shredded leaves to retain moisture.
- ● Pruning shears: For deadheading spent blooms (encourages more flowers!).
- ○ Pest control (optional):
- ● Neem oil or insecticidal soap (for aphids or Japanese beetles).
- ● Beneficial nematodes (to deter grubs).
- ● Climate: Hardy in USDA Zones 4-9 (adjust care for extreme heat/cold).
- ● Timing: Seeds: Start indoors 8-10 weeks before last frost or direct-sow in spring/fall. Plants: Transplant after soil warms to 60°F+ (late spring).
- ● Patience: Bee balm may take 2-3 years to reach full bloom potential!
Step-by-step guide to planting and cultivating Monarda bee balm
This hardy pollinator favorite thrives with minimal fuss once you nail these key steps.
Choose the Perfect Location for Sun and Moisture
Monarda demands full sun to partial shade—at least 6 hours of direct sunlight daily for optimal blooms. I always site it where morning sun warms the soil gradually, then afternoon shade prevents wilting. The plant's deep roots crave consistently moist conditions, so avoid rocky or heavily compacted soil where water drains too quickly.
Dig a hole twice as wide as the root ball but only as deep. Loosen the sides of the hole with your hands or a trowel to encourage root spread. Here's the thing—bee balm tolerates wet feet better than most perennials, but soggy soil will rot the crown over time. Amend heavy clay with 2-3 inches of compost mixed into the bottom third of the hole to improve drainage while retaining moisture.
Plant with Proper Spacing and Mulching
Space plants 2-3 feet apart in all directions to allow airflow and prevent powdery mildew, a common fungal issue. I've found that wider spacing pays off in later years when plants spread naturally. Place the root ball so the top sits level with the surrounding soil—burying too deep stresses the crown, while planting too high leaves roots exposed.
Backfill with native soil mixed with 1 inch of compost, pressing gently to eliminate air pockets. Water deeply to settle the soil around roots. Next, apply 2-3 inches of organic mulch (like shredded bark or straw) over the root zone, keeping it 6 inches away from stems. This mulch layer mimics the plant's native woodland edge habitat while suppressing weeds and conserving moisture.
Water Consistently During Establishment
Keep the soil evenly moist but not soggy for the first 6-8 weeks after planting. You'll know you're doing it right when the top 1-2 inches of soil stay damp to the touch but don't feel waterlogged. I water in the early morning to allow foliage to dry before evening, reducing disease risk. Overhead watering can spread fungal spores, so use a soaker hose or drip irrigation at the base instead.
Once established, bee balm becomes remarkably drought-tolerant, but the first year is critical. If you notice leaves curling or wilting in heat, give it a deep watering—this plant signals thirst before it's too late. The key is consistency: let the soil dry slightly between waterings, but never to the point of bone dryness.
Prune Strategically for Health and Blooms
Cut back one-third of the plant in early spring before new growth emerges to encourage bushier growth. I use clean, sharp pruners and make cuts just above a set of leaves or buds. This pruning also removes any dead stems from winter and opens the plant for better airflow. Wait until after the first flush of blooms in summer to do any additional pruning—cutting back too early removes next year's flower buds.
After the first bloom cycle, deadhead spent flowers by snipping the entire stem back to just above the next set of leaves. This encourages a second (and sometimes third) round of blooms. Real talk: bee balm gets leggy if you skip deadheading, and those long, bare stems look unattractive by fall. I always leave a few seed heads for pollinators if I want to collect seeds for next year.
Overwinter and Prepare for Next Season
Bee balm's woody stems die back naturally in winter, but the roots remain dormant. In late fall, cut back stems to 4-6 inches above the ground after the first hard frost. This prevents snow mold and makes spring cleanup easier. I leave the mulch in place through winter—it insulates roots and protects against temperature swings.
In early spring, remove any dead foliage and add a 1-inch layer of fresh compost around the base. This feeds the plant as new growth emerges. Here's where it gets fun—watch for the first bright green shoots in late spring. These emerge from the crown and signal it's time to resume regular care. The plant's resilience means it handles winter beautifully, but this simple prep ensures vibrant blooms year after year.
Tips & tricks for perfect Monarda bee balm flower cultivation
Common pitfalls—and how to sidestep every one—when growing this pollinator powerhouse.
Location Intelligence: That 6 hours of sunlight requirement is non-negotiable for peak blooms, but here's the thing—morning sun (when temperatures are cooler) followed by afternoon shade prevents leaf scorch. I've seen bee balm in full sun locations wither by midday, so if your garden gets intense afternoon heat, consider partial shade after 2 PM. The plant's native habitat along woodland edges gives us this clue: it thrives with protection from harsh midday rays.
Soil Science: The 2-3 inches of compost mixed into heavy clay isn't just about nutrients—it's about creating the perfect moisture balance. Bee balm tolerates wet feet better than most perennials, but soggy soil will rot the crown. Test your soil's drainage by digging a hole and filling it with water—if it doesn't drain within 2 hours, you need more compost or consider a raised bed. I've had success with 1 part compost to 3 parts native soil for clay-heavy areas.
Watering Wisdom: Those 6-8 weeks of even moisture are critical, but timing matters just as much. Watering in early morning (before 10 AM) prevents fungal spores from lingering on leaves overnight. The 1-2 inches of damp soil check is your best gauge—stick your finger in and feel for moisture. If it's dry at that depth, water deeply until it runs out the bottom of the hole. Overhead watering spreads powdery mildew, so a soaker hose at the base is your best friend during establishment.
Pruning Precision: The one-third spring pruning might seem drastic, but it's what transforms bee balm from a leggy mess to a bushy powerhouse. Cut just above a set of leaves or buds to encourage branching. And here's what nobody tells you—if you're growing bee balm for its lemon-scented leaves (not just flowers), avoid heavy pruning until after the first bloom. The leaves develop their signature citrus aroma as they mature, so let some stems grow long enough to harvest.
Pro Tips for Monarda Bee Balm Flower
- Common pitfalls—and how to sidestep every one—when growing this pollinator powerhouse.
- Location Intelligence: That 6 hours of sunlight requirement is non-negotiable for peak blooms, but here's the thing—m...
- Soil Science: The 2-3 inches of compost mixed into heavy clay isn't just about nutrients—it's about creating the perf...
Frequently asked questions
Got questions about growing and enjoying Monarda bee balm flower? You’re not alone! Here are answers to the most common queries—from planting tips to troubleshooting—so you can cultivate this pollinator’s paradise with confidence.
When is the best time to plant Monarda bee balm?
Plant Monarda in early spring (after the last frost) or early fall (6–8 weeks before your first frost). This gives roots time to establish before extreme heat or cold. For container gardening, you can plant anytime the soil isn’t frozen!
Why aren’t bees visiting my bee balm flowers?
Bees love Monarda, but if they’re skipping it, check these fixes:
- Timing: Peak bloom (mid-summer) is prime time—plant companion flowers (like lavender or coneflowers) for earlier nectar.
- Pesticides: Avoid synthetic sprays; opt for neem oil or insecticidal soap if pests are present.
- Water stress: Dry soil can deter pollinators—keep the roots consistently moist (but not soggy).
Can I grow Monarda in containers? If so, what size pot do I need?
Monarda thrives in containers with at least 12–18 inches of depth and good drainage. Choose wide pots (14+ inches in diameter) for bushier growth. Use a well-draining potting mix with compost, and place in full sun to partial shade.
How do I prevent powdery mildew on my bee balm?
Powdery mildew (a white fungal film) is common in humid climates. Prevent it with:
- Spacing: Plant 18–24 inches apart for airflow.
- Watering: Water at the base in the morning to let foliage dry.
- Fungicide: Spray with baking soda mix (1 tsp baking soda + 1 quart water + a drop of soap) or neem oil if mildew appears.
Can I dry bee balm flowers for crafts or tea?
Yes! Harvest flowers when fully open (morning after dew dries). Dry them in one of these ways:
- Air-drying: Hang small bundles upside down in a dark, dry place for 1–2 weeks.
- Oven-drying: Spread on a baking sheet at 200°F (93°C) for 1–2 hours (check frequently).
Wrapping up and next steps
Monarda bee balm isn’t just a stunning pollinator magnet—it’s a year-round beauty that brings life to your garden while supporting bees, butterflies, and hummingbirds. 🐝 Whether you’re growing it for its vibrant blooms, medicinal uses, or eco-friendly appeal, this hardy plant offers effortless charm and ecological benefits in equal measure.
Ready to invite more buzz into your space? Start small—plant a single bee balm in a sunny spot, or go big with a pollinator-friendly garden. Grab your seeds or cuttings today and watch your garden transform into a thriving haven for wildlife!