
Flowers
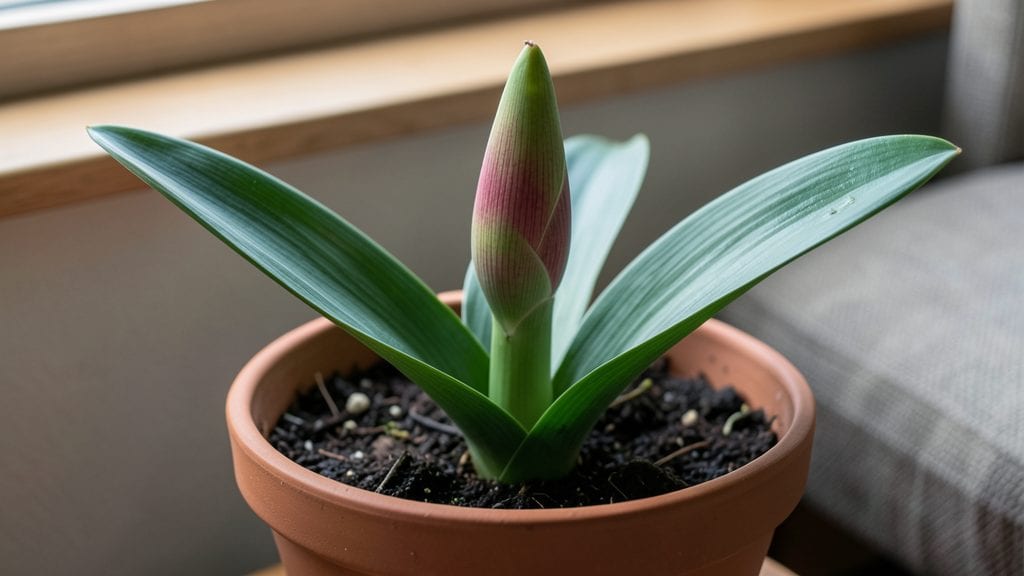
Watch those amaryllis flower buds burst into life this winter—it’s all about the forcing techniques that trick nature’s timing. 🌱 I’ve forced amaryllis indoors for years, and the secret lies in mimicking their natural dormancy cycle with precise light, warmth, and patience.
Most people rush the process, but the real magic happens when you let the bulb rest first.
The key supplies are simple: a 6-inch pot, well-draining potting mix, and a sunny windowsill (or grow light). After planting, keep the soil barely moist—never soggy—and place the pot where it gets 6-8 hours of bright light daily.
The first buds appear in 6-8 weeks, but consistency is everything. Too much water or cold drafts will stall progress.
When those buds finally form, you’ll see thick, waxy stems pushing through the leaves—proof you’re doing it right. With proper support (like a small stake) and steady care, each bloom lasts 7-10 days, filling your home with bold, trumpet-shaped flowers. The scent alone makes it worth the wait.
Works for paperwhites too, but amaryllis rewards patience with larger, showier blooms. Even beginners succeed with this method—just avoid these pitfalls: overwatering, drafty spots, or skipping the initial rest period. Let’s get those bulbs blooming!
📚 In This Guide
- What you need
- Instructions
- Tips and common mistakes
- Wrapping up and next steps
What you need
- ● 1 healthy amaryllis bulb (size 12–16 cm in diameter, with firm, unpeeled skin)
- ● 1–2 pots (15–20 cm diameter, with drainage holes; terracotta or ceramic preferred)
- ● Potting mix (well-draining: 50% cactus/succulent mix + 50% perlite or pumice)
- ○ Peat pellets or sphagnum moss (optional but helpful for moisture control)
- ● Watering can with a narrow spout (to avoid over-saturating the bulb)
- ● Room-temperature water (not cold or hot)
- ● Bright, indirect light source (south- or east-facing window, or a grow light)
- ○ Thermometer (optional but helpful) (to monitor 65–75°F / 18–24°C range)
- ● Fertilizer (balanced 10-10-10 or bloom booster, diluted to half-strength)
- ● Mulch or decorative stones (to retain moisture and add aesthetic appeal)
- ● Humidity tray (if your home has dry air)
- ● Support stake or floral wire (to prop up heavy buds as they grow)
- ● Spray bottle (for gentle misting if using peat moss)
Step-by-step instructions for forcing amaryllis flower buds indoors
Here's how to coax vibrant winter blooms from your dormant amaryllis bulbs.
🌱 Step 1: Select and Prepare the Bulb
Choose a healthy, firm amaryllis bulb that's at least 6-8 inches in diameter—larger bulbs produce more robust blooms. Inspect for any soft spots or mold, which can signal rot or disease. If you're reusing a bulb from last year, let it rest for 8-10 weeks after flowering before forcing again.
Here's the thing—amaryllis bulbs need a clean slate to perform well. Gently brush off any dried soil or old roots with your fingers. Avoid cutting or trimming the bulb itself; even small wounds can invite rot. Place the bulb in a shallow dish and soak it in lukewarm water for 10-15 minutes to rehydrate it before planting. This step jumpstarts the forcing process and ensures the bulb absorbs moisture quickly.
☀️ Step 2: Plant and Provide Warmth
Fill a 6-8 inch diameter pot with well-draining potting mix—amaryllis bulbs hate soggy roots, so avoid heavy garden soil. The pot should only be large enough to accommodate the bulb with about 1-2 inches of space between the bulb and the rim. Plant the bulb with its neck (the narrower, top portion) exposed above the soil line.
Position the pot in a warm spot with temperatures between 65-75°F. A sunny windowsill or under a grow light works well, but avoid cold drafts. You'll see the first signs of life—tiny green shoots or roots—within 2-4 weeks. Until then, keep the soil lightly moist by watering only when the top inch feels dry to the touch. Overwatering now can drown the bulb before it even starts growing.
💧 Step 3: Encourage Bud Formation
Once the shoot reaches 4-6 inches tall, that's your cue to increase care. Fertilize with a balanced, water-soluble fertilizer diluted to half strength—amaryllis bulbs are sensitive to over-fertilizing, which can burn the roots. Apply the fertilizer every 2 weeks until buds form, but stop once the flower stalk appears. This prevents excessive foliage growth at the expense of blooms.
Rotate the pot a quarter turn every few days to ensure even light exposure. You'll notice the flower stalk emerging from the center of the bulb—this is the moment that matters. Keep the soil consistently moist but not waterlogged, and maintain bright, indirect light. Direct sunlight can scorch the leaves, while insufficient light leads to weak, leggy stalks that may not bloom.
⏰ Step 4: Support and Maintain Blooms
When the flower stalk reaches 10-12 inches tall, it may need support. Insert a small wooden stake or floral wire gently into the soil beside the stalk and tie it loosely with soft twine. Avoid tightening the tie too much—you want to guide the stalk without restricting its growth. The blooms will open in 6-8 weeks from planting, depending on the variety and conditions.
Once the buds open, enjoy the blooms for 7-10 days before they fade. Here's what I do next: I continue watering and fertilizing the bulb to encourage strong foliage growth. This helps the bulb store energy for next year's blooms. After the flowers fade, you can cut the stalk at the base, but leave the leaves intact. They'll continue photosynthesizing for 6-8 weeks after blooming, feeding the bulb for future growth.
Tips & tricks for perfect amaryllis flower buds
Here's what nobody tells you about coaxing those stunning winter blooms from your dormant bulbs.
Bulb Selection Intelligence: The size matters more than you think. A 6-8 inch diameter bulb is your sweet spot—anything smaller may produce fewer blooms, while larger ones can sometimes yield two or even three flower stalks. I've learned this the hard way after forcing smaller bulbs that only put out one or two sad little blooms. Confession: I skipped this step for years and wondered why my amaryllis never lived up to its potential.
Rehydration Technique: That 10-15 minute soak in lukewarm water isn't just about hydration—it's about waking up the bulb's metabolism. The water should feel comfortably warm to your wrist, not hot. After soaking, let the bulb sit for 10 minutes on a paper towel before planting to prevent waterlogging. This step makes all the difference in getting those first shoots to appear within that crucial 2-4 week window mentioned in Step 2.
Light Management Strategy: When your shoot reaches 4-6 inches and you're rotating the pot, pay attention to which side gets the most light. The side facing the light will grow slightly faster. This is normal—just rotate the pot so all sides get equal exposure over time. I've seen beginners get concerned about uneven growth, but this is actually how the plant naturally seeks light. The key is consistent rotation to prevent the stalk from leaning too much.
Support System: When you reach the 10-12 inch mark and need to provide support, don't just grab any old stake. Look for something sturdy but flexible—bamboo stakes work beautifully. Insert it gently beside the stalk and tie it loosely with twine. The secret is to adjust the tie as the stalk grows. I've ruined perfectly good stalks by tying them too tightly too soon, which restricts growth. Think of it as giving the stalk a gentle hug, not a stranglehold.
Pro Tips for Amaryllis Flower Bud
- Here's what nobody tells you about coaxing those stunning winter blooms from your dormant bulbs.
- Bulb Selection Intelligence: The size matters more than you think.
- Rehydration Technique: That 10-15 minute soak in lukewarm water isn't just about hydration—it's about waking up the bulb's metabolism.
Frequently asked questions
How long does it take for an amaryllis flower bud to bloom after forcing?
Once you’ve planted your amaryllis bulb and placed it in a warm, bright spot, buds typically appear in 6–10 weeks. The actual blooms usually last 7–10 days per stalk, but the bulb may produce multiple flower stalks over time. Patience is key—consistent care (like proper light and water) speeds up the process!
Can I force an amaryllis flower bud indoors in winter if my home is very cold?
Yes, but you’ll need to create a warm environment (ideally 65–75°F). Place your pot near a south-facing window or under grow lights if natural light is limited. Avoid drafts or cold spots—amaryllis bulbs hate sudden temperature drops. A heat mat under the pot can also help in chilly homes!
What should I do if my amaryllis flower bud turns brown or mushy?
Brown or mushy buds usually signal overwatering, rot, or stress. Let the top inch of soil dry out between waterings, and ensure the pot has drainage holes. If the bulb itself feels soft or smells foul, trim the affected bud and check for root rot. Reduce water immediately and repot in fresh, well-draining soil if needed.
Can I force multiple amaryllis bulbs at once for a bigger display?
Plant 2–3 bulbs in a single container (like a decorative planter) for a stunning winter show. Just ensure the pot is large enough (at least 6 inches wide per bulb) and space them apart. Each bulb may produce 2–6 flower stalks, so you’ll get an abundance of blooms!
What’s the best way to make my amaryllis rebloom next year?
After blooming, keep the plant alive by watering and fertilizing lightly (every 4–6 weeks) until fall. Then, reduce water and move it to a cool, dark spot (50–55°F) for 8–10 weeks to simulate dormancy. Resume watering in early spring, and repeat the forcing process. With care, your bulb can rebloom for years!
Wrapping up and next steps
Growing amaryllis flower buds into stunning indoor blooms is a rewarding journey that brings warmth and color to your winter days! 🌸 With the right forcing techniques, patience, and care, you can transform dormant bulbs into vibrant centerpieces.
Whether you’re a beginner or a seasoned gardener, the key lies in timing, light, and consistency—and now you’ve got all the tools to succeed.
Ready to see your hard work pay off? Start by monitoring your buds and adjust care as needed—soon, your home will be filled with the beauty of amaryllis blooms! Share your progress or ask questions in gardening communities for extra support. Happy growing! 🌱