
Container Gardens
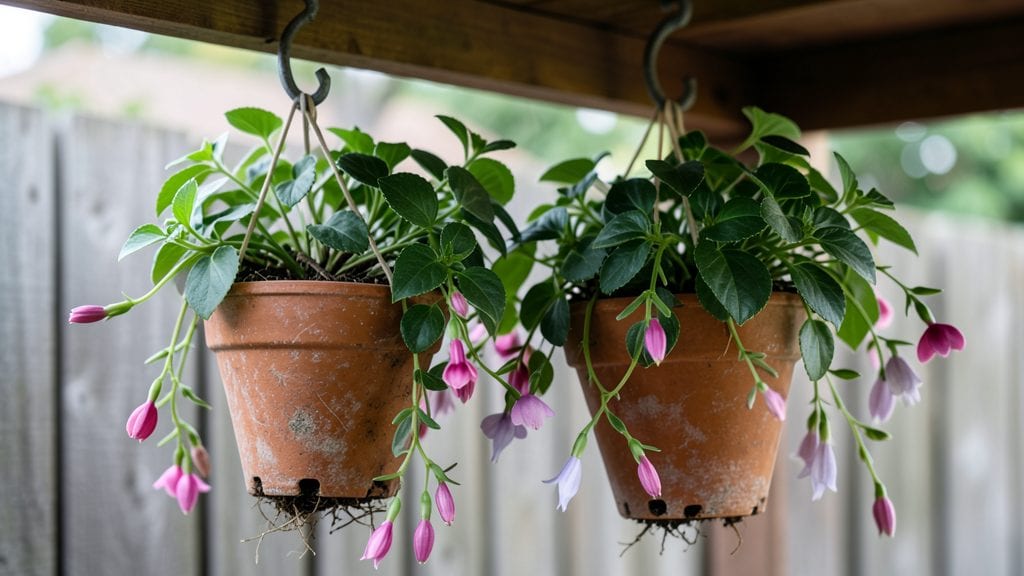
Hanging flowerpot hooks turn empty walls into lush vertical gardens that steal the show. ✨ I’ve transformed my tiny balcony into a thriving green oasis using just a few sturdy hooks and repurposed pots—no fancy tools or expensive setups required.
The best part? You can create this display in under an hour, even if you’ve never hung a single pot before.
These hooks aren’t just functional—they’re the secret weapon for small spaces. Whether you’re dressing up a patio railing, a chain-link fence, or a wooden trellis, they let you grow herbs, trailing flowers, or even small vegetables without sacrificing floor space.
Durable materials like galvanized steel or heavy-duty plastic ensure your plants stay secure, while adjustable hooks let you customize spacing for different pot sizes.
Imagine cascading ferns brushing your shoulders, vibrant petunias spilling over the edges, or fresh basil within arm’s reach for cooking. With proper drainage and a little thought about weight distribution, your hanging garden will look effortless—like it belonged there all along.
The best designs start with a simple layout, so let’s get those hooks installed and your vision growing.
From rustic farmhouse charm to modern minimalism, the styling possibilities are endless. Mix textures with woven pots and sleek ceramic, or go monochromatic for a polished look.
Just remember: lighter pots work best for high hooks, and always check weight limits before hanging. Your walls will thank you—and so will your plants.
📚 In This Guide
- What you need
- Instructions
- Tips and common mistakes
- Wrapping up and next steps
What you need
- ● Flowerpot hanging hooks: 2–4 hooks (depending on weight capacity and design). Opt for sturdy metal or heavy-duty plastic hooks rated for 5–20 lbs each (check your pots’ weight!).
- ● Flowerpots: 1–4 lightweight yet durable pots (terracotta, fiber, or plastic). Ensure they have drainage holes and fit your hook’s size.
- ● Drill or screwdriver: For installing hooks into walls, ceilings, or railings.
- ● Screws or anchors: #8–#10 wood screws (for drywall) or toggle bolts (for heavier loads on plaster/brick).
- ● Measuring tape & pencil: To mark hook placement for even spacing.
- ● Level: Ensures your hooks are straight and pots hang evenly.
- ● Potting soil & plants: Choose lightweight soil mixes (like coco coir or peat-based blends) to reduce pot weight.
- ● Hook covers or sleeves: For a polished look (especially for indoor setups).
- ● Ceiling-mounted brackets: If hanging from ceilings (requires structural support—avoid drywall-only mounts!).
- ● Adjustable hooks: For flexibility in pot sizes or future swaps.
- ● Spray paint: To match hooks to your decor (use rust-resistant paint for metal hooks).
- ● Safety gear: Gloves and safety goggles if drilling into hard surfaces.
How to install hanging flowerpot hooks for a vertical garden
Here’s how to transform walls into lush green displays—no heavy lifting required!
🪴 Step 1: Choose the Right Hooks and Locations
Start by picking sturdy wall-mounted hooks rated for the weight of your pots. For 4-5 gallon pots, use hooks that support at least 15-20 pounds each. I like L-brackets or heavy-duty S-hooks because they grip walls securely and distribute weight evenly.
Next, scout your wall for stud locations—these are the wooden frames behind drywall that hold real weight. Use a stud finder (or tap walls gently—stud areas sound solid) to mark spots 12-18 inches apart for balanced hanging. Avoid electrical outlets or plumbing pipes, and keep hooks at least 6 inches from corners for stability.
☀️ Step 2: Mark and Drill for Secure Installation
Hold your hook against the wall at the marked stud location and trace its outline with a pencil. This keeps your drill bit from wandering. For wood studs, pre-drill ¼-inch pilot holes to prevent wood splitting—especially if you’re using screw-in hooks. For drywall-only areas, use toggle bolts or heavy-duty anchors designed for hanging weights.
Real talk: If you’re unsure about studs, skip the hooks and mount onto floating shelves instead. You’ll thank me later when your pots don’t crash to the floor. For extra security, test-fit the hook before final tightening—wiggle it slightly to ensure it’s snug against the wall.
💧 Step 3: Hang Pots and Balance for Safety
Start with the heaviest pots on the lowest hooks to keep the center of gravity low. Slide the pot’s built-in hook or wire basket over the wall hook, then lift gently to avoid straining your back. If using macramé hangers, loop them through the hook twice for extra security—no one wants a pot swinging like a pendulum during a breeze.
Here’s the thing—uneven weight distribution is the #1 cause of hook failures. Space pots evenly along the hook line and avoid clustering three heavy pots on one side. For windy areas, add a second hook on the opposite side of the pot and loop the hanger through both for stability.
✂️ Step 4: Maintain and Adjust Over Time
Check hooks every 3 months for tightness—vibrations from watering or wind can loosen screws over time. If a hook feels loose, remove the pot, tighten screws, and rehang. I like to keep a small toolkit with a screwdriver and extra anchors nearby for quick fixes.
Watch for plant growth shifts—as vines or trailing plants grow heavier, they’ll pull pots downward. Adjust by repositioning the pot higher on the hook or adding a supportive stake inside the pot to share the weight. This keeps your vertical garden looking intentional, not saggy.
Tips & tricks for perfect flowerpot hanging hooks
No more guessing games about what makes your vertical garden stay put—these are the game-changing details that separate a wobbly disaster from a show-stopping display.
Hook Weight Capacity: When you're selecting those sturdy wall-mounted hooks for your 4-5 gallon pots, don't just glance at the weight rating—double-check it! I learned this the hard way after watching a 5-gallon pot pull a hook right out of drywall. For every pot, calculate the weight of soil plus plants (add 2-3 pounds for water saturation) and choose hooks rated 50% above that total. That extra strength margin is what keeps your garden looking intentional, not like a failed science experiment.
Stud Location Strategy: In Step 1, when you're marking those 12-18 inch intervals for your hooks, here's what nobody tells you: The first hook should always be placed at the center of your wall section. This creates a balanced fulcrum point that prevents the entire line from tilting. I mark my center point first, then measure outward symmetrically. For extra security in drywall-only areas, use anchors rated for 20 pounds more than your heaviest pot's weight.
Drilling Technique: That ¼-inch pilot hole in Step 2 isn't just a suggestion—it's your insurance policy against wood splitting. Use a drill bit that's exactly ¼-inch (not ⅛-inch) and drill at a slight downward angle when working with screw-in hooks. For drywall anchors, tap them gently with a hammer after insertion to ensure they're fully seated. I keep a small level handy to verify my pilot holes are perfectly vertical before inserting screws.
Windproofing Secret: For that extra security in windy areas mentioned in Step 3, here's my pro move: Install two hooks on opposite sides of each pot (even if your hanger only needs one). Thread the hanger through both hooks and adjust the spacing so the pot hangs perfectly level. This creates a natural shock absorber system that prevents the swinging motion that can loosen hooks over time. It takes 5 extra minutes but saves you from future repairs.
Pro Tips for Flowerpot Hanging Hook
- No more guessing games about what makes your vertical garden stay put—these are the game-changing details that separate a wobbly disaster from a show-stopping display.
- Hook Weight Capacity: When you're selecting those sturdy wall-mounted hooks for your 4-5 gallon pots, don't just glance at the weight rating—double-check it!
- Stud Location Strategy: In Step 1, when you're marking those 12-18 inch intervals for your hooks, here's what nobody tells you: The first hook should always be placed at the center of your wall section.
Frequently asked questions
Got questions about hanging your flowerpots in style? Here are some of the most common ones—and their easy answers!
What’s the best material for a flowerpot hanging hook?
For durability and rust resistance, stainless steel or powder-coated metal hooks are ideal. If you’re going for a rustic look, wrought iron works too—but check for weatherproof coatings. For lightweight pots, plastic or nylon hooks are budget-friendly and easy to install.
How much weight can a hanging hook support?
Most standard hooks handle 5–15 pounds per pot, but always check the manufacturer’s weight limit. For heavier pots (like terracotta), opt for heavy-duty hooks with reinforced screws or wall anchors. Pro tip: Distribute weight evenly—never hang two pots on one hook!
Do I need special tools to install flowerpot hanging hooks?
Basic tools like a drill, screws, and a level are usually enough. For masonry walls, a masonry bit and wall anchors are a must. If you’re renting or avoiding damage, adhesive hooks (for lightweight pots) or over-the-door hooks are great alternatives!
How do I prevent hooks from rusting or breaking in rain?
Choose galvanized, stainless steel, or coated hooks to resist rust. For extra protection, apply a clear sealant to metal hooks. Avoid over-tightening screws—this can weaken the hook over time. If using outdoor hooks, check them seasonally for wear and tighten as needed.
Can I hang flowerpot hooks on drywall without damaging the wall?
Yes! Use toggle bolts, snap toggles, or heavy-duty adhesive hooks designed for drywall. For lightweight pots (<5 lbs), command strips work temporarily. Always pre-drill holes and avoid overloading—drywall isn’t as sturdy as studs!
What’s the best way to hide unsightly hooks or screws?
Try these tricks:
- Paint them to match your wall or decor.
- Use hook covers or decorative plates for a polished look.
- Hang pots near plants or greenery to camouflage them.
- Opt for invisible hooks (like those with hidden screws).
Wrapping up and next steps
Transforming your space with vertical gardens is easier—and more stylish—than ever with the right flowerpot hanging hook! Whether you’re a seasoned gardener or just starting, these hooks unlock endless creativity, helping you maximize small spaces while adding a touch of greenery to any room. 🌿
Now that you’re armed with the how-tos and answers to common questions, it’s time to take action. Start by picking a hook that matches your decor and plant needs—then let your green thumb shine! Shop now or browse DIY ideas to make your vision a reality. Happy hanging! ✨