Flowers
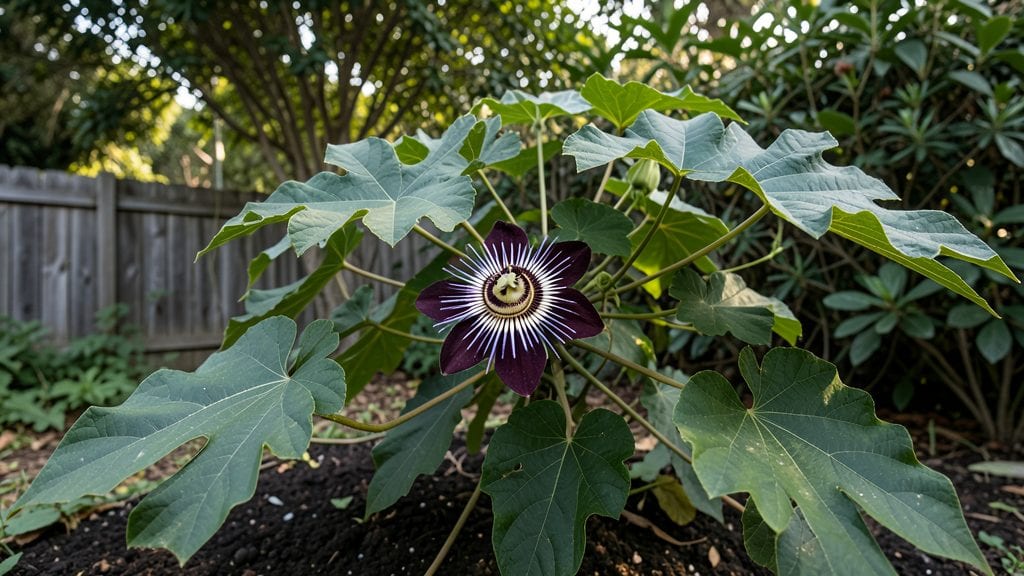
Growing Spanish passionflower means waking up to starburst blooms that look like they’re straight out of a tropical dream. 🌺 These vines aren’t just showstoppers—they produce edible fruit too, though the real magic is in those intricate, velvety flowers that hummingbirds adore.
I’ve learned the hard way that these plants demand patience, but once they’re established, they reward you with six-foot vines covered in blooms all summer long.
They thrive in full sun to partial shade, so a south-facing trellis or fence is perfect—just avoid harsh afternoon heat in hot climates. The soil needs to drain well, but don’t let it dry out completely; think moist but not soggy.
A little morning watering keeps them happy without the risk of root rot, and they’ll repay you with bold, purple-and-white flowers that last for weeks.
Pruning is where most gardeners trip up—cut back leggy growth in early spring to encourage bushier vines, and remove dead flowers to prolong blooming. The fruit, called maracujas, ripens into a tangy, citrusy treat, but the real star is the ornamental display.
With the right care, your Spanish passionflower will become the centerpiece of your garden, drawing in pollinators and turning heads.
Works beautifully in USDA Zones 8-11, but even in cooler areas, you can grow them in containers and bring them indoors for winter. The key is consistency—once they find their footing, these vines will climb, bloom, and feed you for years. Let’s get yours started!
📚 In This Guide
- What you need
- Instructions
- Tips and common mistakes
- Wrapping up and next steps
What you need
- ● Passionflower plants: 1-2 young Passiflora edulis (Spanish passionflower) plants (choose organic or disease-resistant varieties if possible).
- ● Well-draining soil: 5-10 lbs of a mix of potting soil (for containers) or loamy garden soil (for in-ground planting), amended with compost or aged manure (2-3 cups per planting hole).
- ○ Containers (optional but recommended for climates with cold winters): 1-2 large pots (12-18 inches in diameter) with drainage holes, or a trellis system (6-8 ft tall) for vertical growth.
- ● Fertilizer: A balanced 10-10-10 or 20-20-20 fertilizer (1 tbsp per plant, applied every 4-6 weeks during growing season) or organic options like fish emulsion or worm castings.
- ● Mulch: 2-3 inches of straw, wood chips, or pine bark to retain moisture and regulate soil temperature.
- ● Gloves: 1 pair of gardening gloves (to protect from thorns and soil).
- ● Trowel or shovel: For digging planting holes (6-8 inches deep and wide).
- ● Watering can or hose with a gentle spray nozzle: Passionflowers love consistent moisture but hate soggy roots!
- ● Pruning shears: For trimming dead or overgrown vines (sterilize with rubbing alcohol between cuts).
- ○ Support structure (optional): A trellis, arbor, or fence (if not using containers) to guide vines upward.
- ● Sunlight access: A full-sun to partial-shade spot (6+ hours of sunlight daily).
- ● Climate check: Passionflowers thrive in USDA Zones 8-11; use containers for colder climates (bring indoors when temps drop below 40°F).
- ● 🌡️ Warm it up: If planting in spring, wait until soil temperatures are above 60°F for best germination.
- ● ✨ Boost blooms: Pinch back new growth in early summer to encourage more flowers (and fruit!).
- ● 🚫 Avoid overwatering: Let the top 1-2 inches of soil dry out between waterings to prevent root rot.
Step-by-step instructions for cultivating Spanish passion flower vines
Here's how to coax these stunning tropical climbers into thriving plants with edible blooms.
🌱 Step 1: Select and Prepare Your Planting Site
Spanish passion flowers (Passiflora edulis) thrive in full sun to partial shade (6-8 hours daily) with protection from harsh afternoon sun in hot climates. Choose a location with a sturdy trellis or fence—these vines grow 15-25 feet annually and need vertical support. I always opt for a south-facing wall in my zone 9 garden, where they get morning sun and afternoon shade.
Amend the soil with 2-3 inches of compost before planting to ensure good drainage. Passion flowers despise soggy roots, so if your soil is heavy clay, mix in pearlite or coarse sand to improve aeration. The planting hole should be twice as wide as the root ball but only as deep—burying too deeply suffocates the plant.
🪴 Step 2: Plant and Establish Your Vine
Remove the plant from its container and loosen the roots gently if they're circling. Position it so the top of the root ball sits 1-2 inches below soil level—this helps prevent stem rot. Backfill with native soil mixed with the 2-3 inches of compost you prepared earlier, tamping lightly to eliminate air pockets.
Water deeply immediately after planting to settle the soil and eliminate air gaps. You'll know it's right when water drains freely from the bottom of the hole. Mulch with 2-3 inches of organic mulch (like wood chips) to conserve moisture and regulate soil temperature. Keep the soil consistently moist but never soggy for the first 4-6 weeks—this is critical for root establishment.
☀️ Step 3: Provide Support and Prune for Growth
As soon as new growth emerges, guide the main vine onto your trellis using soft plant ties. Never use wire or anything that can cut into the tender stems—passion flowers grow best when gently encouraged upward. I like to use fabric plant ties that stretch as the vine thickens. Prune any side shoots back to 2-3 leaves to focus energy on the main stem during the first growing season.
Fertilize lightly with a balanced 10-10-10 fertilizer every 4-6 weeks during the growing season. Too much nitrogen produces lush foliage but few flowers. Watch for new leaf growth—that's your signal to fertilize again. When flowers appear, switch to a low-nitrogen, high-phosphorus fertilizer (like 5-10-10) to encourage more blooms.
✂️ Step 4: Prune and Harvest for Continued Production
After the first flush of blooms, prune back the vine by one-third to encourage bushier growth. Cut just above a leaf node where new growth can emerge. This is also when you'll start seeing those edible starburst fruits—harvest them when they're fully colored but still slightly firm to the touch. I always wear gloves when handling them, as the fruits can stain clothing.
In colder climates, cut back the vine to 6-8 inches tall before winter. Even in frost-free zones, a light pruning in late winter helps stimulate new growth. Watch for new shoots emerging from the base in spring—that's your cue to resume regular care and support.
💧 Step 5: Maintain Through Seasons
Water deeply once weekly during dry spells, allowing the top 2 inches of soil to dry between waterings. Overwatering is the #1 killer of passion flowers—yellowing leaves usually mean you're watering too much. In hot climates, provide afternoon shade to protect the delicate blooms from scorching.
Watch for pests like spider mites or aphids, which love the tender new growth. A strong spray of water usually dislodges them, but for persistent infestations, use neem oil as a natural treatment. With proper care, your Spanish passion flower will reward you with vibrant blooms and sweet-tart fruits for years to come.
Tips & tricks for perfect Spanish passion flower cultivation
Took me years to master these tropical beauties—here's what nobody tells you about growing them right.
Sunlight Strategy: That 6-8 hours of sun is non-negotiable, but the afternoon shade in hot climates is just as critical. I've seen passion flowers scorch in direct afternoon sun, even in zone 9. If you don't have natural shade, use a lightweight shade cloth (30-50%) during peak sun hours (11am-3pm). The key is maintaining that balance—too little sun means fewer blooms, too much means crispy leaves.
Soil Science: The 2-3 inches of compost isn't just fluff—it's where the magic happens for these tropical plants. I always mix in worm castings (about 1 cup per planting hole) for extra microbial activity that helps roots establish faster. And if your soil is heavy clay, that pearlite or coarse sand amendment is essential—passion flowers will literally rot if their roots stay waterlogged. Think of it as creating a sponge-like environment rather than a swamp.
Pruning Precision: When you prune back by one-third after the first flush of blooms, always cut just above a leaf node where new growth emerges. I use clean, sharp pruners and make cuts at a 45-degree angle about 1/4 inch above the node. This prevents water from pooling on the cut and reduces disease risk. And here's the secret: the 2-3 leaves you leave behind aren't just for show—they photosynthesize and provide energy for the new growth you're encouraging.
Fertilizer Timing: That switch from 10-10-10 to 5-10-10 when flowers appear isn't arbitrary—phosphorus is what triggers blooming. I've found that applying the 5-10-10 fertilizer right when you see the first flower buds forming gives the biggest bloom boost. And remember, less is more with these tropical plants—over-fertilizing leads to lush foliage but no fruit. Think of it as giving your plant a gentle nudge rather than a steroid shot.
Pro Tips for Passion Flower Spanish
- Took me years to master these tropical beauties—here's what nobody tells you about growing them right.
- Sunlight Strategy: That 6-8 hours of sun is non-negotiable, but the afternoon shade in hot climates is just as critical.
- Soil Science: The 2-3 inches of compost isn't just fluff—it's where the magic happens for these tropical plants.
Frequently asked questions
Got questions about growing Passiflora edulis (Spanish passionflower)?
Here are answers to the most common queries—from pruning to pests and everything in between!
When is the best time to plant Spanish passionflower?
Plant your Spanish passionflower in early spring after the last frost, when soil temperatures are consistently above 60°F (15°C). If growing from seeds, start indoors 8–12 weeks before the last frost for a head start. Pro tip: Young plants are frost-sensitive—wait until nighttime temps stay above 50°F (10°C)!
How long does it take for Spanish passionflower to bear fruit?
With ideal conditions (full sun, well-draining soil, and patience!), expect 2–3 years before your passionflower produces edible fruits. Some vigorous varieties may bloom sooner, but consistent care (like regular watering and pruning) speeds up fruiting. Fun fact: The first flowers may not yield fruit—let the plant focus on root growth!
What pests or diseases should I watch for with Spanish passionflower?
Common issues include:
- Spider mites (tiny webs on leaves) – Treat with neem oil or a strong spray.
- Whiteflies – Use yellow sticky traps or insecticidal soap.
- Fungal diseases (like powdery mildew) – Improve airflow and avoid overhead watering.
- Root rot – Ensure pots have drainage holes and soil isn’t soggy.
Prevention tip: Inspect leaves weekly, especially under foliage, for early signs!
Can I grow Spanish passionflower in containers, and what size pot do I need?
Spanish passionflower thrives in containers with at least 15–20 gallons of space (5–7 gallons for dwarf varieties). Use a fast-draining mix (cactus/succulent blend + perlite) and a pot with drainage holes. Key tip: Move pots indoors or to a sheltered spot if temps drop below 40°F (4°C).
How and when should I prune my Spanish passionflower?
Prune in late winter or early spring to shape the plant and encourage bushier growth. Cut back:
- Dead or diseased branches first (use sterilized shears).
- Overly long vines to 1/3 of their length to redirect energy.
- Weak or crossing stems to improve airflow.
Pro move: Prune after fruiting to prep for next year’s blooms!
Wrapping up and next steps
Growing Passiflora edulis (Passion Flower Spanish) is a rewarding journey that brings stunning blooms and delicious fruit to your garden. Whether you're drawn to its vibrant flowers or the promise of tropical fruit, this hardy climber thrives with the right care—sunlight, support, and patience. 🌿✨
Ready to take the next step? Start by selecting a sunny spot, gathering your materials, and giving this beauty the love it deserves. Before you know it, you’ll be harvesting your own granadilla or admiring its mesmerizing star-shaped flowers—nature’s little masterpiece! 🌺🍈